Rice Crackers: Experiment 1 & 2

September 7th, 2009

I found a recipe for rice crackers that intrigued me. I knew wheat crackers could be easy to fix, but had never quite gotten around to the trying them. (I had spent time looking for the gadgets that you can use to perforate the crackers as opposed to slicing them into small squares.)

Today i’ve made i made my first and second attempts at rice crackers. I have “commercial rice flour” from the bin at Whole foods. Is this mochiko*? No idea. I’ll assume not.

To scale down, i use 1/2 c flour to 1/2 c of tap-warmed water and then added some more flour and a bit of brown sugar. It remained more like a batter than a dough. Instead of steaming it, i microwaved for 1 min on high. The resulting dough was stiff and reminded me of fimo. I kneaded it a little and then rolled it out between wax paper, placed it on a lightly greased pizza pan & flipped (greasing both sides).

With a pizza cutter, i made squares, and then i seasoned with a variety of sweet (more brown sugar, cinnamon) and savory (salt, cracked pepper, powdered onion).

I cooked it in a preheated oven at 350° for ten minutes (compare to “dry outside on mats in the sun”). The thinner ones at the edge were a bit hard and crunchy, the middle were chewy. Undercooked. One could just see where they might begin to “blister” (think of surface of saltines).

Christine put the remainders of the samples back in at 450° for roughly ten minutes. They turned golden, but were still a little tough.

The second experiment 1/2c flour to 1/2c warm water which i left in a battery state and microwaved on high for 30 seconds. The remarkable thing was the clear ring of where the microwaves heated the batter at the greatest strength: this was stiff like the earlier batter. The remainder was more like a thickened cream of wheat. I mixed this up and had a much sticker dough to which i belatedly added a bit of brown sugar.

Once it was kneaded to a smooth consistency (using more rice flour to protect against the stickiness), i started flattening, spraying with canola oil, folding, and flattening again. I’m hoping for flaky inner layers where the sheets of rice flour are fried by the inner layers of oil.

I rolled out — which was easier with this softer doug — cut and seasoned, and baked at 450° F for 16 min.

If anything, it’s the hotter oven temperature that made for the more successful trial. I’m not sure the oil needed to be incorporated. They definitely satisfy a desire for a crunch, and can be comfortably salty/savory or sweet. The thinner they are, i think the crisper, although i wonder if my small oven just bakes more hot on the outside edges.

I will probably try these again.

* Mochiko flour is also known as sweet glutinous rice flour, sweet rice flour, or mochi flour. — http://www.recipetips.com
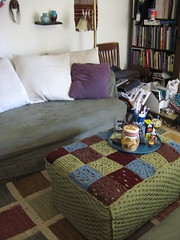
Hassock Cosy

August 30th, 2009


Hassock Cosy

Originally uploaded by Elaine with Grey Cats.

The hassock cosy is so imperfect in so many ways, but it is done done done! It is fun, and even though the couch is a different green, the previous hassock was a color similar to the side drapes. I did buy more yarn — four skeins of chocolate, two of the green, and a mustard — on eBay, from which i plan to make some cushion covers for the cushion on the chair and perhaps a mini-afghan for Greycie Loo to be enthroned upon.

Many business meetings went into making the sides of the hassock cosy!

To Dye For: Experiment #2

July 27th, 2009

Yesterday i tested the same dye concentrates as in To Dye For Experiment 1, but many weeks older. The statements are that the concentrates keep their strength for a week, possibly longer if refrigerated.

I’ll admit i did not bring the dyes up to room (deck) temperature. Both the azure & the emerald should have better intensity with warmer water. I’ll admit, though, the azure is doesn’t need to be more intense.

A, B, & C are attempts at diluting the dyes to get a pale shade. The emerald C seems almost the same intensity as full strength I.

D, F, & H are from the previous dye sessions, as controls to see how the color changed with time.

G, the orchid, stayed close to true with time. E, the blue, lost its strength, which is actually quite useful. I, the emerald, seems to have not just faded but also drifted some. The emerald dyebath was the first yesterday, so i don’t think it’s a contamination issue.

A, G, & I are also attempts at "faux ikat dyeing," inspired by Linda La Belle’s The Yarn Lover’s Guide to Hand Dyeing.

(Click through to see the threads from experiment #1)

To Dye For: Experiment #2

Read the rest of this entry »

To Dye For: Experiment #1

July 5th, 2009

To Dye For: Experiment #1

To Dye For: Experiment #1To Dye For: Experiment #1To Dye For: Experiment #1To Dye For: Experiment #1

Began making up dye on Friday and dyed off and on on Saturday.

After the cut, reports on the yarn & thread experiment and the glue resist experiment.
Read the rest of this entry »

Yogurt pie

July 5th, 2009

I have a recipe clipping from the 90′s for a yogurt pie prepared in an 8″ graham cracker crust. The pie had the ratios of 1/2 packet of gelatin to 1 c water to 1c yogurt to 8 oz of cream cheese, and i’d often made it with mixed berries. I made it several summers in Philadelphia but haven’t felt much motivation since moving to California until now.

I found a second recipe that looked interesting, and i used up the last of the gelatin making it. (I was intrigued by the pineapple-gelatin combination, but then read that the problem is with *fresh* pineapple.)

Since i’d wanted to replace the gelatin with a vegetable gelling agent, i gave tapioca a try in a berry variation. I used ratios more like the new recipe, which did not call for cream cheese. I’m not sure i prepared the MINUTE® tapioca appropriately: it said it could be microwaved on high for ten minutes, stirring every three minutes. I think this may have overcooked it. It seemed very gelled when done, but when mixed in with the yogurt i think it did not reset. I poured it over blueberries and laid out stripes of sliced strawberries across the top.

The first “pie” provided a good control case to compare to the tapioca-yogurt mix. It certainly gelled and could be cut with a knife, leaving solid bar shapes. The tapioca-yogurt mix retained some definition, but couldn’t be served retaining shape. Since i was leaving out crusts in both cases, if the texture doesn’t change much it begs the question of why not just flavor the yogurt and be done.

Both were yummy though!

Quick research this afternoon suggest that cornstarch may set up more firm, but needs a higher gelatinization temperature.

Mixing yogurt with something hot deserves two points of attention. one is that the active cultures die above 120° F, the other is that non-fat yogurt will curdle.

More about gelling agents, and pineapple & gelling agents, after the cut.
Read the rest of this entry »

Notes From Color By Accident & elsewhere

June 26th, 2009

My first post about dyeing fabric is here. I requested a couple books from the library via ILL that weekend, including Ann Johnson’s Color By Accident. Much of her text is about color mixing: it may be an interest i grow to have, but it’s not where i’ll start. I’ve selected preblended colors from Dharma. AJ’s text has some interesting instruction on the techniques of low water immersion dying, though, so i’ve taken notes on her technique (after the cut) and will annotate over time with other references.
Read the rest of this entry »

Dyeing crochet thread: a plan

June 25th, 2009

My general plan for dying samples of each yarn is to explore the variations of two different “prep” methods and graduated variation in dye bath time. (I’m curious about going in dry — i may make some swatches to test that, too.) My hope is that not only will i have a good guide to getting the effects i wish, but also a collection of graduated yarns with which i can make an interesting object. The size of the samples will vary: one size that is long enough for making motifs up, another that is just swatch size. Most skeins/samples will be in groups of six, to measure the effect of dye times over ten minute intervals for a maximum of one hour.

Once “note” for this test is that i am using pre blended colors: i understand from my reading that the components of the colors can have different uptakes with time. If there is a fast reacting color (say red) and a slow reacting color (say blue), the first item in may pull a larger ratio of the faster reacting dye out of the dyebath than later elements. It’s possible i’ll see color shifts as well as gradations.

I’ve been working on this post in draft mode, but now that i’ve ordered the dye, i’ll post & keep updating as i prepare the skeins & swatches.

Read the rest of this entry »

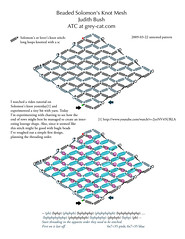
Crochet Pattern for Solomon’s Knot

June 22nd, 2009


Crochet Pattern for Solomon’s Knot

Originally uploaded by Elaine with Grey Cats.

This weekend i decided that i was done with this experiment. While waiting for the Office 2008 12.1.9 update to download, i found the scans of all my Solomon’s Knot work and this pattern to post and release.

The pattern is now sort of tested. I have a PDF and will send if requested.

Marshall Creek, Ben Lomond, CA

June 13th, 2009


Marshall Creek, Ben Lomond, CA

Originally uploaded by Elaine with Grey Cats.

Apparently, i did not blog about the Intensive with joe Decker in April of this year. I’ll admit things have flown by this year with conferences and retreats and events. Last weekend i was at the Quaker Center in Ben Lomond, CA, a retreat center in the Santa Cruz mountains, and during the free time in the afternoon, i tried to take some redwood creek photos informed a little by the intensive. Mostly, i realized i really needed a tripod. I made do with my purse (what i carried the water bottle and binoculars in). More from that series here.

Skein Diameter: Help!

May 31st, 2009

Is there a standard understanding of what diameter means with respect to skeining yarn? I would assume that it means the length of the skein, the long dimension of the ovoid shape. It’s just that as i read the instructions and look at the pictures in Linda La Belle’s The Yarn Lover’s Guide to Hand Dyeing it seems that the pictures show skeins that seem like they must be different than deduced from that definition.

For example, reviewing the “faux ikat dyeing” technique, a total of 140 yards is to be skeined into a 10 yd diameter skein. My interpretation of diameter would then mean that a circuit was 20 yards, so the 140 yards would make seven circuits. The illustration shows more than seven strands in the circuit, though, and the resists applied more closely than the two per yard calculated from the 40 to the skein would produce if the skein is 20 yds in circumference.

Also, must find what a larks head knot is. It’s part of the instructions but never described.